Project 1: Li'l Squirt - Soda Bottle Water Rocket
"A journey of a thousand miles begins with a single step.", and here we are starting small, very small!
Project 1 has been christened Li'l Squirt, it is really just to get going, try out a few different simple things, get the 3D Printer busy, different printing settings etc. seeing what pressures it could handle,
It is a simple 500ml soda bottle water rocket.
Engine Nozzle
I started off by having a look on Thingiverse to see if anyone had created any nozzles. Sure enough, I found one. Downloaded the STL file and printed it off.
AtomKemp - Soda Bottle Water Rocket Kit - https://www.thingiverse.com/thing:109523
Creating the Launch Mount
Next, I need to get some way of pressurising the bottle, and needed something to insert the nozzle into. I modelled up an adaptor in Tinkercad.
The Launch Mount can be found at: https://www.tinkercad.com/things/2YWmrYh1zm0
The first print was looking looking good half way through, I say was, because I was printing it from the SD Card, but still had USB attached to the computer. I opened Ultimaker Cura on the computer, and it grabbed the printer and bombed the print, leaving a big hot spot and mound on the surface. You can see it on the right of the picture on the upper surface.
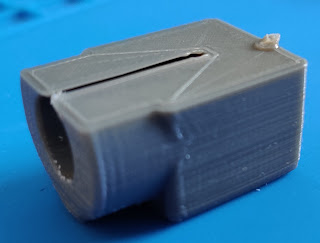
The second mount I printed out, the hole was too small for the nozzle, but rather than print another one out, I elected just to sand down the nozzle to fit, but did update the model for if and when I need to print another. The small tube at the right allowed the foot pump hose to be connected. I definitely need to get hold of a digital caliper/micrometer, rather than using a crappy plastic ruler. There has been a few times I have been trying to measure stuff accurately and failed miserably.
I recovered the bottle and screw it onto the nozzle again, but this time I could feel it click and loosen. Closer inspection of the threads I could see it hadn't really taken a good hold. Turns out the bottle had another smaller rim that stopped the threads going all the way into the nozzle. I took a deburring tool and opened up the nozzle a bit, and now it screwed onto the bottle perfectly.

Starting to pump I could see some small leaks from the side of the nozzle, about half way down, so the plastic was leaking, I just kept pumping and then the nozzle parted, the stem of the nozzle remained attached to the launcher, the bottle took off, but only went about 3 to 4 feet in the air, and proceed to hover around for a couple of seconds in a sort of circular pattern before running out of energy and coming down to crash land.

It is by now I really wished I had taken the time to set up a camera, because even though it was failure, it still gave me a good chuckle.
The first nozzle I had printed was at layer height 0.2 mm and 20% infill, so I expect it didn't have the structural integrity to hold back the pressure.
The launch mount on the other hand, I printed it with 0.1 mm layer height and 100% infill, and it feels solid in comparison. I think I will also modify the launch mount to add some tabs to allow it to be screwed down, but will maybe do that later, depending on how things go with Nozzle Print 2.
This time, it was not much better, it still leaked, I hadn't deburred it cleanly and leaked round the o'ring. It took a short flight, crashing into the balcony, it also snapped the lower part of the nozzle tip off, but nothing that would prevent a re-use.
There are still 3 things need to work on, launch mount hold down, a release mechanism and a launch rail.
I modelled a part that would fit over the launch adaptor, with a cut out to let the hose connection out. I also put 3 tabs on it for screwing it down. It only need a little smoothing at the hot bed end to open back up to the original diameter and then the launch adaptor was a pretty snug fit as is going nowhere.
The hold down mount can be found at: https://www.tinkercad.com/things/5lPZSc3Pj4c
You can see the two pieces put together below.

The Launch Rail Mount can be found at: https://www.tinkercad.com/things/0V10MI45Oei
We unfortunately had a power cut while it was printing, but when the power came back on, I just hit the resume print and it carried on with only minimal marks on the print so no need to reprint. You can see the mark mid-way up where the layer restarted.

I had a bit of old wood that I screwed what I had printed so far down onto. I orientated the hose and the rail so I could put the launch rail between the rocket and the person doing the pumping. I then used some zip ties to fix the rail runners to the bottle and held them in place with glue gun. I put some pressure into the bottle so I could pull the zip ties tight without the bottle flexing as much. This meant I could position the runners on the stiffer parts of the bottle.

You will also notice in the release rail mount I drilled a hole and screwed the rail to the mount. This was done to stop the rail moving upwards with the force from the T piece and the release arm being forced up by the pressure.


The launch arms can be found at: https://www.tinkercad.com/things/9N2X5SOvV8T
Here is a slow motion of the release mechanism;
At this point I decided that if we were going to start getting more pressure into the bottle, I didn't want to be standing a couple of feet away. I was also going to use a small 12v air compressor I had for my ATV. I popped in past the DIY shop and picked up a 10m coiled air line. The fittings didn't match the air compressor, so had to swap them over, but it was straight forward enough.
Unfortunately, while attached the new air hose to the launch mount, I managed to bend and break off the nipple connection. I increased the OD of the nipple to 7mm on the original model and then printed out another one, it is a lot more sturdier now.
I also cut some stiff foam out, to make a basic very rough nose cone and some fins to see if this helps stabilise it.
Time for more testing! Here is a video containing a few of the tests where we actually managed to get air time, all be it very short duration! Some of the flights were also shot from my daughters phone, and her view follows the primary view.
Still not getting a good seal though, and another few tests could not exceed 40psi. Need to revisit this launch mechanism in a future project.
Here is the latest couple of tests, taken from a couple of different angles....you can see in the close up from a GoPro the leaks out the bottle neck seal.
Well, that's it for Project 1 - Li'l Squirt for the time being. It has been an interesting start, especially getting to grips with the 3DPrinting and modelling the components.
The first print was looking looking good half way through, I say was, because I was printing it from the SD Card, but still had USB attached to the computer. I opened Ultimaker Cura on the computer, and it grabbed the printer and bombed the print, leaving a big hot spot and mound on the surface. You can see it on the right of the picture on the upper surface.

The second mount I printed out, the hole was too small for the nozzle, but rather than print another one out, I elected just to sand down the nozzle to fit, but did update the model for if and when I need to print another. The small tube at the right allowed the foot pump hose to be connected. I definitely need to get hold of a digital caliper/micrometer, rather than using a crappy plastic ruler. There has been a few times I have been trying to measure stuff accurately and failed miserably.
Test 1: Dry test
I used some thread tape to see up the bottle threads, and also wrapped the nozzle for shoving into the launch mount. I connected up the foot pump and wedge in the nozzle, it took a pretty good grip. I gave it a dry pressure test and slowly began to pump. I could hear the bottle creaking as it popped the little indentations back out on its base. Then it just took off! Short across the balcony through railings and of into the garden! Excellent.Test 2: Wet Test
Next, I decided to do a water test. I went outside and tried to find something to securing it to, i simply laid a bit of wood across the hose and put about 1/3 water into the bottle. there were a few leaks but with a bit of frantic pumping off it went, launched into the air about 40 or 50 feet. That's when I noticed the bottle had released from the nozzle, and the nozzle had stayed attached in the launch mount. Hmmm......I recovered the bottle and screw it onto the nozzle again, but this time I could feel it click and loosen. Closer inspection of the threads I could see it hadn't really taken a good hold. Turns out the bottle had another smaller rim that stopped the threads going all the way into the nozzle. I took a deburring tool and opened up the nozzle a bit, and now it screwed onto the bottle perfectly.
Test 3: Wet Test #2
I secured the mount and hose to a metal bar I found in the shed, and connected the nozzle into the launch mount after filling the bottle about 1/3 with water again.
Starting to pump I could see some small leaks from the side of the nozzle, about half way down, so the plastic was leaking, I just kept pumping and then the nozzle parted, the stem of the nozzle remained attached to the launcher, the bottle took off, but only went about 3 to 4 feet in the air, and proceed to hover around for a couple of seconds in a sort of circular pattern before running out of energy and coming down to crash land.

It is by now I really wished I had taken the time to set up a camera, because even though it was failure, it still gave me a good chuckle.
The first nozzle I had printed was at layer height 0.2 mm and 20% infill, so I expect it didn't have the structural integrity to hold back the pressure.
The launch mount on the other hand, I printed it with 0.1 mm layer height and 100% infill, and it feels solid in comparison. I think I will also modify the launch mount to add some tabs to allow it to be screwed down, but will maybe do that later, depending on how things go with Nozzle Print 2.
Test 4: Nozzle #2
This time, the second nozzle was printed with 0.1 mm layer, 100% infill, the same as the launch mount. I had also found some o'rings that fitted tight round the neck of the bottle, so when the nozzle was screwed on it was really tight. Also, with some PTFE tape on the threads, it should hopefully be a lot more water tight.This time, it was not much better, it still leaked, I hadn't deburred it cleanly and leaked round the o'ring. It took a short flight, crashing into the balcony, it also snapped the lower part of the nozzle tip off, but nothing that would prevent a re-use.
Test #5: Nozzle #2 cleaned up.
I smoothed the edge using some far too rough P60 grade sandpaper, it is all I had. Definitely need to get some smoother grade next time I am at the DIY shop. Leak wise it was a lot better this time. There was only a small leak. It took off at some random pressure and spiralled around before crashing down. Cleaned up the joint some more and screwed it back on with a bit more thread tape over the o'ring and see if we get a better seal the next.There are still 3 things need to work on, launch mount hold down, a release mechanism and a launch rail.
Launch Mount Hold Down
I modelled a part that would fit over the launch adaptor, with a cut out to let the hose connection out. I also put 3 tabs on it for screwing it down. It only need a little smoothing at the hot bed end to open back up to the original diameter and then the launch adaptor was a pretty snug fit as is going nowhere.The hold down mount can be found at: https://www.tinkercad.com/things/5lPZSc3Pj4c
You can see the two pieces put together below.

Launch Rail
I had some old aluminium curtain rail, 15 mm x 10 mm and some runners that ran really freely in it. I knocked up a part that fitted the dimensions and added some tabs on each side to screw down to hold it vertical. It was a perfect snug fit.The Launch Rail Mount can be found at: https://www.tinkercad.com/things/0V10MI45Oei
We unfortunately had a power cut while it was printing, but when the power came back on, I just hit the resume print and it carried on with only minimal marks on the print so no need to reprint. You can see the mark mid-way up where the layer restarted.

I had a bit of old wood that I screwed what I had printed so far down onto. I orientated the hose and the rail so I could put the launch rail between the rocket and the person doing the pumping. I then used some zip ties to fix the rail runners to the bottle and held them in place with glue gun. I put some pressure into the bottle so I could pull the zip ties tight without the bottle flexing as much. This meant I could position the runners on the stiffer parts of the bottle.

Release Mechanism
I decided that I was going to go with a simple pivot locking mechanism, with the arm pushing down on the neck rim of the bottle just where you can see the white PTFE tape in the picture above. I printed out another rail mount and used another piece of the rail to act as the vertical arm. I then printed a two fingered arm which would act as the horizontal, and then a T piece to act as the locking key, the pressure in the bottle should push against the arm which will pivot and get restrained by the T piece. To release, simply yank out the T piece using a bit of string. You can see the hole in the T piece where the string will be attached.You will also notice in the release rail mount I drilled a hole and screwed the rail to the mount. This was done to stop the rail moving upwards with the force from the T piece and the release arm being forced up by the pressure.


The launch arms can be found at: https://www.tinkercad.com/things/9N2X5SOvV8T
Here is a slow motion of the release mechanism;
At this point I decided that if we were going to start getting more pressure into the bottle, I didn't want to be standing a couple of feet away. I was also going to use a small 12v air compressor I had for my ATV. I popped in past the DIY shop and picked up a 10m coiled air line. The fittings didn't match the air compressor, so had to swap them over, but it was straight forward enough.
Unfortunately, while attached the new air hose to the launch mount, I managed to bend and break off the nipple connection. I increased the OD of the nipple to 7mm on the original model and then printed out another one, it is a lot more sturdier now.
I also cut some stiff foam out, to make a basic very rough nose cone and some fins to see if this helps stabilise it.
Time for more testing! Here is a video containing a few of the tests where we actually managed to get air time, all be it very short duration! Some of the flights were also shot from my daughters phone, and her view follows the primary view.
As you can see, the rocket is still flying straight, it goes into a tumble when it runs out of thrust, not sure if this is expected behaviour or not! I have have since re-shaped the nose cone slightly as it wasn't very evenly cut.
I also noticed that when the pressure is building, the launch arm cannot hold back the pressure and the rocket raises slightly. I have now increased the thickness of the launch arm from 4 mm to 6 mm.
In an attempt to help seal the nozzle in the launch mount, in addition to the stronger arm, I have added an o'ring round the neck, to see if this also increases the force against the sealing face, as well as providing a more uniform sealing face.
Here is the latest couple of tests, taken from a couple of different angles....you can see in the close up from a GoPro the leaks out the bottle neck seal.
Well, that's it for Project 1 - Li'l Squirt for the time being. It has been an interesting start, especially getting to grips with the 3DPrinting and modelling the components.

Great job for publishing such a beneficial web site. Your web log isn’t only useful but it is additionally really creative too. hose nozzle
ReplyDeleteLast time I browsed, the majority of shops do not have a water spigot standing nearby ready for you to have a live demonstration of their substantial choice of watering devices. garden hose nozzle
ReplyDeletesure the plants selected will do well where they are designated to go. You need only contract with the one operation and they generally have the man-power to get the job done. Landscaping Wylie TX
ReplyDeleteRainbow Riches is considered one of many slot machines with a Leprechaun theme. It is a fun and thrilling sport 메리트카지노 with loads of fascinating features to maintain you entertained, like a bonus round referred to as Pick Me, or Pots of Luck. There is a Wild that helps to create a winning combination by matching certain symbols collectively. Make certain to concentrate to the Leprechaun’s hat, nonetheless, as this could set off a bonus round.
ReplyDelete